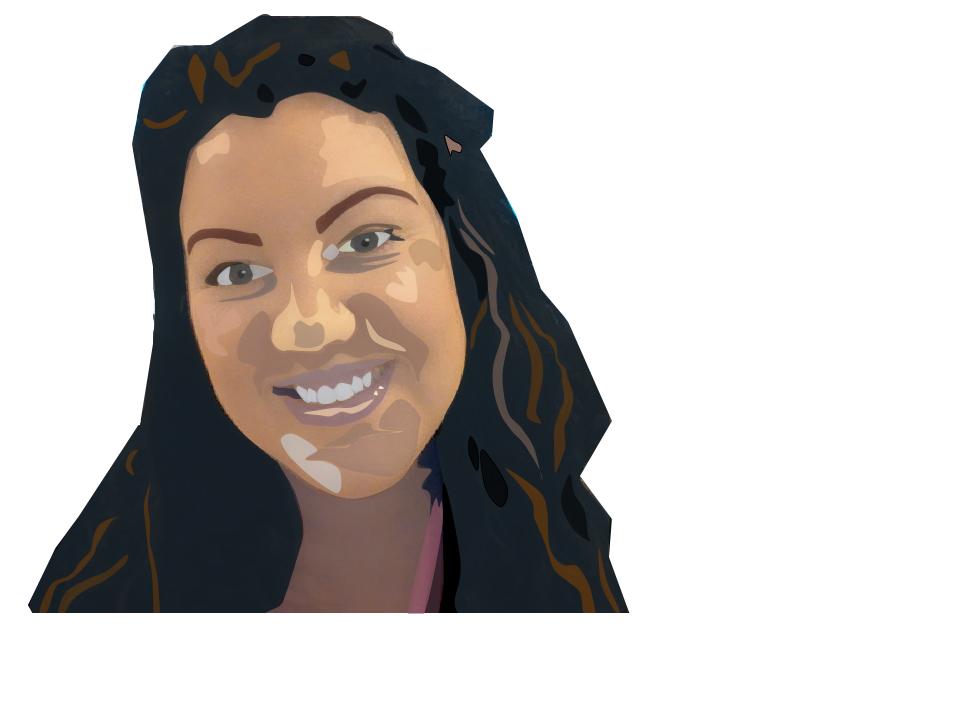
Step 1. -Open Google Drawings and look around. -Title your drawing with your first and last name and self portrait. - Investigate the different tools. Step 2. - Insert> Image> Take Snapshot - Take a few selfies and then select your favorite one. Try to get the top of your hair to your shoulders. - You can see my starter image below. Step 3. Find the Line tool, notice there are multiple line options. We will mainly be using the Curved or Polyline tool. Step 4. Using the Curve line tool outline your face only. When you are finished your ends must connect and "Snap together."  Step 5. The area you just selected will turn blue (or whatever color you have selected at the time). For now we are going to be turning this area transparent. You can do that by going to your Paint Bucket and selecting "transparent." This is important so we can see what we are working on. We can always change the settings later.  Step 6. - Now do the same thing and highlight your hair, do it in one big chunk. We can add detail in later. It seems a little crazy but trust in the process and I promise the outcome will be pretty cool!  Just like when we selected our face, our hair turns blue. Do the same thing Paint bucket> transparent.  Step 7. Now you can begin to put some detail into your hair. You are NOT tracing every little piece of hair. You are thinking in chunks of color. Use your line tool to draw shapes of color. Remember to turn each selection Transparent (paintbucket). Repeat until your hair is finished. 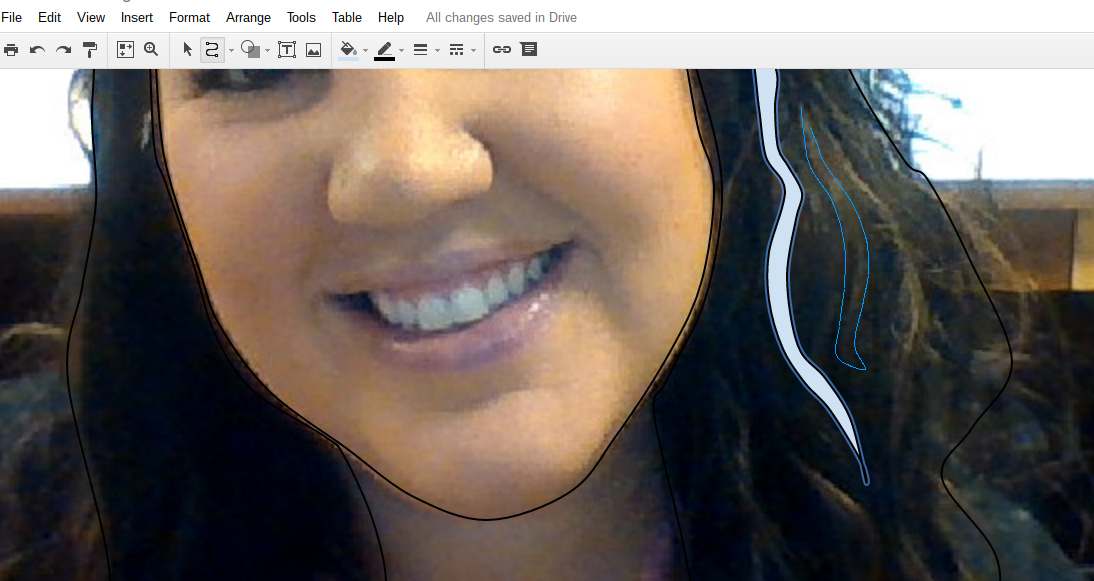 Your hair will start to look like this.... REMEMBER TO SELECT CHUNKS OF COLOR. Then paint bucket> transparent... are you tired of me saying this yet? :)  Step 8: - Now begin on your face. I started with my eyebrows. Use your curve tool to select areas of color. - I promise this will all begin to make sense soon.  Step 9: - Your picture will start to look a little crazy.... keep trusting. - Continue selecting chunks of color. Do not just outline your nose because its a nose. Think in color blocks.  Step 10: - Once you think you have everything outlined you will begin filling in with color. - In the app store install the "ColorPick eyedropper." - This will allow you to take color samples from your picture and use the colors to fill that specific area you sampled from. We can adjust the transparency at the end.   Step 11: Don't worry if your picture looks unfinished, it will soon come together. Keep filling shapes with color. You can go back adjust and fine tune in this stage. You can even add more spots of color you feel like you might have missed.  Below is a zoomed out view of my image. I am getting close to the end. There are a few things left to do. We need to change our background white by selecting the area and filling with white. We need to take out all the black lines. And the last step is to adjust transparency so you can see a little bit of the original image. A good balance will help your image have a more polished and finished look. 
0 Comments
Leave a Reply. |


